|
You got yourself a backpacking backpack. Now what? How am I supposed to fit all the stuff I need on a camp into such a small pack?
These may be questions you ask yourself while packing for a backpacking trip. While there isn't a perfect way to pack, there are
guidelines available that can help achieve an optimum comfort and stability level. The rule of thumb is to cut down on items that
are not needed. Remember whatever you bring, you will also have to carry. The section below breaks down the right way to pack your
backpacking backpack.
|
What to Pack
Before filling up their new backpacks, scouts should go through their gear to filter out items that need to be included and
items that is good to have but not absolutely necessary. There are items such as food and water that each scout require; while
other items, such as an mp3 player, the scout does not absolutely need. The ten essentials list found in the scout book is a
minimum of items that should be included in your pack. The ten essentials are as follow:
- Map and Compass
- Sun Screen
- Extra Clothing
- Flashlight
- First Aid Kit
- Fire Starter (Matches)
- Knife or Multi-Tool
- Extra Food
- Water
- Rain Gear
The ten essentials should be placed in a bag and stored in the outer section of the backpack for quick and easy access. The
storage of the ten essential varies depending on the scout; however the scout should keep in mind that if the ten essentials
is stored at the bottom of the pack, the scout would need to empty their pack before they could retrieve what they need such
as a knife or a flashlight. Other items that may be useful are as follows:
- Stove and Fuel
- Mess Kit
- Tent and Tarp
- Ground Pad
- Bug Repellent
- Sleeping Bag
- Rope
- Whistle or Signaling Device
- Toiletry Kit - Toilet Paper, Tooth Brush, Soap, etc.
The items listed above are items that are good to have but not absolutely needed for survival. When packing, the scout should
determine the importance of each item and determine if it is necessary. This list may change depending on the scout and should
be updated based on each scout's experience level. During packing, each scout should also determine the terrain of the trip. On
a trip where the weather is warm and dry, a scout can go through a gallon of water a day. At 8.35 pounds a gallon, you can see
how the weight of the pack can go up really fast.
|
Weight Distribution
Now that we have filtered the items that we need and want, we can begin filling our pack. Since each scout is carrying such
a heavy load, it is important that the backpack is balanced and that the center of gravity is as low as possible. A rule of
thumb is to keep heavy items as close to your body as possible and any items that are lighter can be placed around the heavy
items. The table below is an example of an item and the weight category that it may belong to.
Light Items:
- Sleeping Bag/Ground Pad
- 10 Essentials (Excluding Water)
- Mess Kit
Medium Items:
- Stove and Fuel
- Water Filter
Heavy Items:
- Water
- Liquid Fuel
- Food
- Tent
The list above is only a general listing. There are equipment available that are used by minimalist
and can be extremely light. These items are made using ultra light material such as titanium to
remove unnecessary weight. While these items are light, they also come with a heavy price tag. So
before purchasing any gear each scout should do research on their product and compare the weight factor
to the cost associated with the item. Once the gear has been separated by weight, it is finally time to
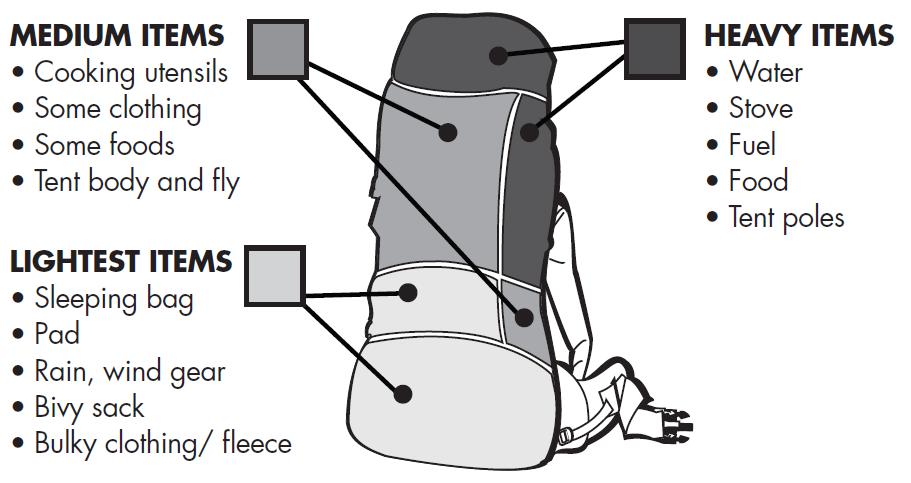
start loading the backpack. The image below provides a guideline on where gear should be stored to obtain
optimal comfort and balance.
|
|
|
As the image above illustrates, lighter items, such as your ground pad and sleeping bag, should be packed
towards the bottom of your pack while the heavier items, such as your tent, is stored at the top of the pack
which is close to your body. By storing heavier items at the top of your pack, the weight is directed over
your center of gravity giving the hiker more stability.
|
Thinking Outside of the Pack
The beauty of a backpacking backpack is that it comes with multiple straps and anchor points that allow the
scout to attach gear on the outside of the pack when room runs out on the inside. While this is an option,
scouts should make every attempt not strap gear to the outside of the pack because it can affect the balance
and will make the pack more prone to snagging. However if strapping gear on the outside of the pack is necessary,
the scout should ensure that the weight is distributed as evenly as possible.
Certain items can be strapped on the outside of the pack without greatly disrupting the balance because of the
size/weight of the item. Tents can normally be strapped on the top of the pack horizontally while sleeping bags and
ground pads can be strapped on the bottom. Long pointy objects such as hiking poles, axes, and shovels should be
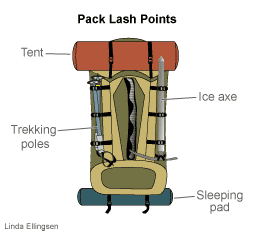
strapped vertically on the front of the pack. The image below illustrates where objects may be secured on the outside.
|
|
|
As the image above illustrates, the outside of the pack can be utilized to allow your pack to carry more or bulky gear.
An external backpacking backpack excels in this because many items can be secured to the external frame. Just remember
that each item a scout secures to the outside of the pack may add weight to the pack which would offset the pack's balance.
|
Adjusting the Pack
You finally got everything in, now how am I going to put this on my back or make it feel better? Remember the goal is to
have 80-90% of your backpack weight on your hips. The backpacking backpack should include additional straps located to
assist in adjusting the pack to achieve optimal comfort. Different packs have different straps; some of the straps that
may be on your pack are as follows:
- Hip belt or Waist belt - Goes around the scout's hip and is used to help transfer the weight of the pack to the
hip and control backpack load.
- Shoulder Strap - Goes around the scout's shoulder and is used to hold the pack against your back.
- Load Lifters - Part of the shoulder strap and is used to lift the pack's weight off the shoulders.
- Sternum Strap - Connects the shoulder strap together and is used to adjust the shoulder straps so the arms may move freely.
- Stabilizer Strap - Located at the hip belt, the stabilizer strap is used to stabilize the load by pulling the pack to be
closer to the body at the hip.
|
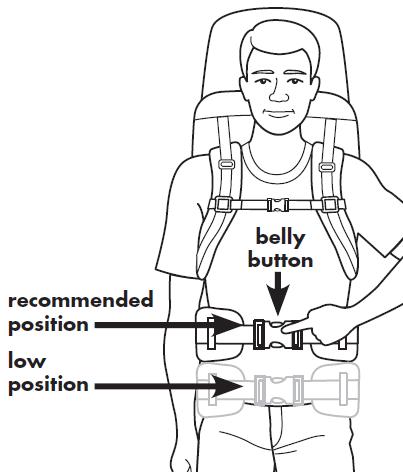
Adjusting the Hip Belt - Once the straps have been identified, we can start adjusting the pack.
Start with the hip belt. The hip belt should be resting over the hip. When connected, tighten the hip
belt ensuring that the belt wraps around your hips comfortably. Keep in mind that there should be at
least a 1 inch margin on each side of the buckle. If there is less than 1 inch, a larger hip belt may
be needed. The image below illustrates the recommend position.
|
|
|
As noted in the picture above, the waist strap should cover the scout's belly button. On other instances,
the belt may be lowered based on the preference of the scout. The thing to keep in mind is that the belt
should sit on the hip so the load of the pack is effectively transferred to the legs.
|
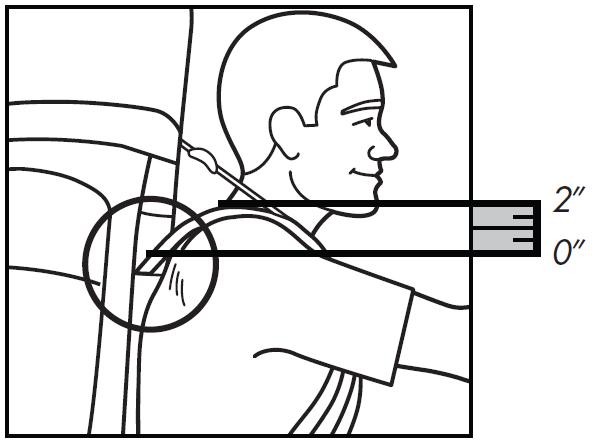
Adjusting the Shoulder Strap - After the hip belt has been adjusted, the scout should adjust the
shoulder straps. The shoulder straps main responsibility is to hold the pack against your body. The straps
should not be supporting the weight of the pack. Once the shoulder straps have been appropriately adjusted,
the strap's anchor points should be 1 to 2 inches below the top of your shoulder. If there is weight on the
shoulder after the adjustment has occurred, the load lifters may have to be adjusted.
|
Adjusting the Load Lifters - The load lifters are the straps that are located on the top of the shoulder
straps and are at a 45 degree angle towards the body of the pack. The purpose of the load lifters is to lift the
pack's weight off the shoulders. The load lifters should only be adjusted so they are snug. The image below
illustrates the layout when the hip belt, shoulder strap and load lifters are correctly configured.
|
|
|
Adjusting Sternum Strap and Stabilizer Straps - The sternum and stabilizer straps are optional, and helps
keep the pack as close to the body as possible as well as allowing your arms to move freely. Similar to the load
lifters, the sternum and stabilizer straps should only be snug and not over tightened. These straps are optional
and are mainly used to increase stability.
Once the straps and lifters have been adjusted, the pack should be ready to use for the scout. With weight in the
back (approximately 20 pounds) have the scout put on the pack and properly secure it to their body. After it has
been secured, have the scout walk around and make note of any pressure points. If pressure points are noted, the
pack may need to be further adjusted. Depending on the type of backpack, the pack may have an adjustable frame
which can be fine tuned to provide better comfort. Once everything has been adjusted, you are ready to go and I
will see you on the trail.
|